
Workshop
The Restoration Process
All restored YOM pairs offered for sale on this website will pass MTO inspection. Over half my sales are generated from restored pairs. One of the most common questions I receive is about restoring a pair you might already own. Unfortunately, I do not accept pairs for restoration. I have many pairs in my own possession that I need to restore along with a growing young family and simply do not have the time to take on more work.
An important step and unique only to YOMplates.ca is that all my fully restored pairs are professionally sandblasted and primed with contractor grade rust-resistant oil based primer. So rest assured, your plates will stand the test of time.
Also, I always restore both sides of the plates. This is particularly important for many vintage cars from the 20s, 30s and 40s where the backs of the plates are exposed. This way your plates won’t stick out like a sore thumb if the backs are exposed. My meticulous 5-step process is illustrated below.
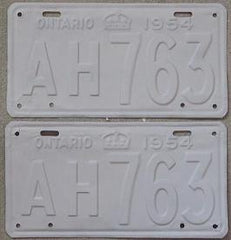
Step 1 – Dent Removal
60% of the plates I find have seen better days. As you can see by this 1954 pair, the plates are severely banged-up, the paint loss is significant and rust is present. I take the time to make sure that the plates lie flat and that any major dents or bends are straightened out as best possible. Please keep in mind that plates manufactured from 1962 to 1972 were much thinner than their predecessors and due to the original manufacturing process a natural warp or bend in the plate developed. This is completely normal and the plates are sold as such. Once attached to your vehicle the plates do lie flat.


Step 2 – Sandblasting
I send most of my fully restored plates out for professional sandblasting. It adds to the cost of restoration, but I believe having a quality and long lasting product are what customers want. For pairs that may just need a quick clean-up, I sometimes use my own grinder to get down to the bare metal. If there are any holes, I use automotive body filler to fill and sand as needed.


Step 3 – Primer Coat
I use contractor grade rust inhibitor primer on all restored pairs to provide a superior base in preparation for the colour coat.


Step 4 – Colour Coat
My personal license plate collection contains either a near mint condition or new old stock (NOS) plate from each year, which I use as a sample for colour matching. There are no colour codes or paint chips available (a common question) – just personal experience in mixing and/or matching the proper colour. I apply 2 to 3 even coats of oil-based paint to ensure your plates have the vibrant, original colour.


Step 5 – Painting the numbers
This is the most painstaking process of all and also the step that generates lots of how-to inquiries. Like Colonel Sanders’ secret recipe, how I apply the paint is my little trade secret! I apply 3 to 4 coats of custom mixed oil-based paint to make sure the numbers are vivid and stand up to the elements.


Other Before and After Pictures


